This Website Is No Longer Running As The Root User

Motivation
Earlier this year, I discussed how I used AI to successfully migrate my website infrastructure from an outdated LAMP stack to a modern architecture based on container technologies. Almost 8 months had passed since then and I feel very proud with the results, I’ve CI/CD in place with a combination of Github actions and Portainer an publishing a new post on this website is as easy as pushing a new commit to https://github.com/alevsk/alevsk.com. I also occasionally host new websites for friends and their events, which are also deployed as containers. I can now manage all of them using a user-friendly interface, eliminating the need to log in to the server via SSH.
I am a fan of Docker and container technologies, but there is a downside: by default, Docker sacrifices security for convenience and in this blog post, I will explain why.
The Problem With Docker
Let’s assume that the root user has a highly sensitive piece of information stored in the secret.txt file.
echo “supersecret” > secret.txt
ls -lhr
total 4.0K
-rw------- 1 root root 12 Sep  3 17:44 secret.txt
If a user who is not the system administrator attempts to read the secret.txt file, they should receive a permission denied error.
cat secret.txt
cat: secret.txt: Permission denied
However, if that user has previously been granted access to Docker, they can simply mount the secret.txt file and read it within the container.
docker run -v "$(pwd)/secret.txt:/tmp/secret.txt" -it alpine sh -c "cat /tmp/secret.txt"
supersecret
In essence, granting a regular user on your system access to the docker command is the same as giving them root access.
Web Applications
Let’s take a look at another example to see the implications of using Docker for containerizing your web applications. This time I’ll run a copy of alevsk.com locally.
docker run -d -p 8080:8080 --name blog_docker docker.io/alevsk/alevsk.com:latest
# listing running docker containers
docker ps -a
CONTAINER ID   IMAGE                      COMMAND                  CREATED         STATUS         PORTS                                               NAMES
61697bf5fffd   alevsk/alevsk.com:latest   "/docker-entrypoint.…"   5 seconds ago   Up 4 seconds   80/tcp, 0.0.0.0:8080->8080/tcp, :::8080->8080/tcp   blog_docker
Running the ps -aux command with the container ID reveals that the root user is running the containerd-shim process. This process manages the lifecycle of our containerized application and interacts with the underlying container runtime. Therefore, our application is effectively running as a root process.
ps -aux | grep 61697bf5fffd
root        7750  0.0  0.2 720776 10488 ?        Sl   23:09   0:00 /usr/bin/containerd-shim-runc-v2 -namespace moby -id 61697bf5fffd1fb3f89a7908486381183d12f176bc336a4be79c384af0d3504a -address /run/containerd/containerd.sock
Threat modeling the above would result in the following.

If an attacker is able to successfully compromise the application and exploit a vulnerability in the container runtime that is running as root, it will break container isolation and may give them root access to the host system. This could allow them to access all files and resources, and ultimately take control of the entire system.
Podman
Podman is a rootless alternative to Docker that is designed to be more secure. It does not require root access, which means that containers can run without root privileges. This means that if an attacker breaks out of a container, they don’t have root privileges and can do less harm.
Let’s do the previous example again, this time using a Podman container.
podman run -d -p 8080:8080 docker.io/alevsk/alevsk.com:latest
# listing running podman containers
podman ps -a
CONTAINER ID  IMAGE                               COMMAND               CREATED      STATUS          PORTS                   NAMES
22f8c743e8ac  docker.io/alevsk/alevsk.com:latest  /bin/sh -c nginx ...  2 hours ago  Up 2 hours ago  0.0.0.0:8080->8080/tcp  laughing_aryabhata
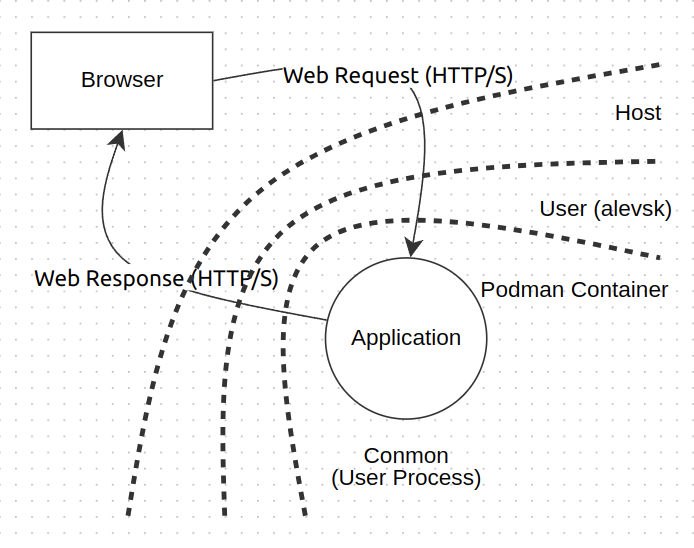
Running the command ps -aux again shows that the process managing the Podman container is not owned by root, but rather by a regular user named alevsk.
ps -aux | grep 22f8c743e8ac
alevsk      8661  0.0  0.0  96928  2560 ?        Ssl  Sep03   0:00 /usr/bin/conmon --api-version 1 -c 22f8c743e8ac688c6c789a540da62c1a3b40a29bf02166791e578c13b9f38bfc -u 22f8c743e8ac688c6c789a540da62c1a3b40a29bf02166791e578c13b9f38bfc -r /usr/bin/crun -b /home/alevsk/.local/share/containers/storage/overlay-containers/22f8c743e8ac688c6c789a540da62c1a3b40a29bf02166791e578c13b9f38bfc/userdata -p /run/user/1000/containers/overlay-containers/22f8c743e8ac688c6c789a540da62c1a3b40a29bf02166791e578c13b9f38bfc/userdata/pidfile -n laughing_aryabhata --exit-dir /run/user/1000/libpod/tmp/exits --full-attach -s -l journald --log-level warning --runtime-arg --log-format=json --runtime-arg --log --runtime-arg=/run/user/1000/containers/overlay-containers/22f8c743e8ac688c6c789a540da62c1a3b40a29bf02166791e578c13b9f38bfc/userdata/oci-log ...
Based on that, let’s now update the previous threat model.
In this scenario the attacker must first successfully compromise the web application. Then, they must use the techniques described above to escape the container. After that, the attacker must still escalate privileges from a regular user account to a root account in order to fully compromise the system. Leveraging Podman rootless features adds an extra layer of complexity to the attack, making things more secure.
Replacing Docker With Podman
I started using Podman a little over a year ago, mostly for local development and experimentation, but never to run it on production systems. After reading up on the tool, I spent a few nights migrating my current container orchestration infrastructure (Portainer, Nginx Proxy Manager, etc.) from Docker to Podman. Here are the challenges I faced and what I ultimately learned.
Running Podman
The installation of Podman is fairly simple. I recommend reading the official documentation first, but it couldn’t be much easier than running the following two commands.
# install podman
sudo apt-get -y install podman podman-compose
# enable podman-restart for root
sudo systemctl enable podman-restart
To deploy a Podman container, first create a YAML file and run the following command: podman-compose -f alevsk-com.yml up -d. The file included the following content.
version: "3.8"
services:
  website-alevsk-com:
    container_name: website-alevsk-com
    image: "docker.io/alevsk/alevsk.com:latest"
    restart: "always"
    ports:
      - "8080:8080"
    networks:
      - internal
networks:
  internal:
    external: true
    name: internal
Running Portainer using Podman is very similar.
version: "3.8"
services:
  portainer:
    container_name: portainer
    image: "docker.io/portainer/portainer-ce:latest"
    restart: "always"
    ports:
      - "9443:9443"
    volumes:
      - "/run/user/${USERID:-1000}/podman/podman.sock:/var/run/docker.sock:Z"
      - "./portainer-ce/data:/data"
    networks:
      - internal
networks:
  internal:
    external: true
    name: internal
Issues and challenges
My blog is one of many containerized apps on my production server. To run some other apps, things get a bit more complicated. For example, a rootless Portainer should not use /var/run/docker.sock because it requires root privileges, but instead should use /run/user/$(id -u)/podman/podman.sock. To do this, first enable the necessary systemctl user service with: systemctl --user enable --now podman.socket. Another issue was that Podman containers could not bind to privileged ports (ports lower than 1024). And finally, to top it off, Podman containers with the --restart=always policy do not restart automatically after a system reboot!
Exposing Podman Containers To Non-Privileged Ports
It is essential to be able to bind Podman containers to lower ports such as 80 and 443 because these are the standard ports used for web browsing. Additionally, port 80 is required to request certificates and solve challenges from Let’s Encrypt.
There are many ways to do this, but I chose to use iptables to solve this problem. I wrote iptables configuration to forward traffic from one port to another as follows:
-
80 -> 8080
-
81 -> 8081
-
443 -> 8443
By default, iptables does not persist any changes after a reboot. To do so, you need to use commands like iptables-save and iptables-restore. You can also use a tool like iptables-persistent to automate this process.
sudo apt install iptables-persistent
sudo systemctl enable netfilter-persistent
Enable automatic startup of all Podman containers on system boot.
This web server is meant to provide content 24/7. Although reboots are rare, they may happen from time to time, so I need to make sure that all of my containers and services will start automatically.
Finding a solution for this was a bit difficult, but it ultimately gave me a better understanding of how systemctl services work. There is already a podman-restart service, but it only works with Podman containers created by the root user.
To enable the same feature for a non-root user, first create a systemd user service in the $HOME/.config/systemd/user/ folder by copying the file directly from /lib/systemd/system/podman-restart.service.
cat >> $HOME/.config/systemd/user/podman-restart.service << 'END'
[Unit]
Description=Podman Start All Containers With Restart Policy Set To Always
Documentation=man:podman-start(1)
StartLimitIntervalSec=0

[Service]
Type=oneshot
RemainAfterExit=true
Environment=LOGGING="--log-level=info"
ExecStart=/usr/bin/podman $LOGGING start --all --filter restart-policy=always

[Install]
WantedBy=default.target

END
Then reload systemd user services and enable podman-restart for the current user.
systemctl --user daemon-reload
# enable podman.socket for current user, necessary for portainer
systemctl --user enable --now podman.socket
# enable podman-restart for current user
systemctl --user enable --now podman-restart
At this point, Podman containers should start automatically at system boot, but only after the user logs in for the first time. To fix this, apply lingering to the user.
sudo loginctl enable-linger $USER
The loginctl enable-linger command enables user lingering for one or more users. When enabled, a user manager is created for the user at boot and is kept around after logouts. This allows users who are not logged in to run long-running services.
Remove Docker And All Of Its Dependencies.
Once the migration is complete and all new services are running correctly, all running Docker containers can be stopped and removed.
# shutdown docker containers
docker stop $(docker ps -aq)
# delete docker containers
docker rm $(docker ps -aq)
To remove all Docker-related packages, first use the dpkg -l | grep -i docker command to find all installed Docker packages. Then, use the apt-get purge command to remove each package. For example:
sudo apt-get purge -y docker-ce docker-ce-cli docker-ce-rootless-extras docker-compose
docker-scan-plugin python3-docker python3-dockerpty docker-compose-plugin
sudo apt autoremove
Delete any extra files that Docker may have created.
sudo rm -rf /var/lib/docker /etc/docker
sudo rm /etc/apparmor.d/docker
sudo groupdel docker
sudo rm -rf /var/run/docker.sock
To verify that Docker is no longer installed on your system, type the following command: docker. If Docker is not installed, you will receive an error message.
Final Thoughts
This article describes how to remove Docker and all of its dependencies from a Linux system. It also describes how to enable automatic startup of all Podman containers on system boot, and how to apply lingering to a user so that Podman containers will start automatically at system boot, even if the user is not logged in.
I am very passionate and concerned about container security. While it is amazing how applications like Portainer allow you to manage a server directly from a web UI, I believe that this comes at a high cost. Applications like Portainer are attractive targets for attackers because they can be used to gain access to sensitive data or to take control of a server. The only thing that stands between a smoothly running server and a hacked server is a login form. As a result, it is in our best interest to add as many layers of security as possible and harden the system.
To save time and effort, I created two Ansible playbooks to automatically configure an environment that supports Podman rootless containers.
If you are interested in learning more about Docker and containers, please check out my slides on Container Security.
Happy hacking.